Issue#2 The Beast Of Bleakmarsh
Here it is,
Issue#2 in the,
Pocket Sized Perils, series. Of the three adventures I've completed at the time of writing,
The Beast of Bleakmarsh, has involved the most work in fitting the adventure I envisaged onto the pages available.
I
wanted this adventure to have the tone of a mystery whilst
simultaneously functioning as a one shot that was playable in a single
session. No mean feat as mysteries require subtlety and a slow build of
suspense whilst one shots require you to cut to the chase.
Whether
or not I succeeded in threading a line between those two, often
contradictory, goals will be up to those who play the adventure
to decide. Certainly, I am counting on Dungeon Masters to use their own skill to bring the town
of Bleakmarsh to life and guide their group towards an exciting
confrontation with the evil that lurks there.
This
blog post breaks down my thinking around and beyond what I was able to
include in the zine as well as providing some added resources for Dungeon Masters and players.
As with all my posts
on the Perils series, this is a companion piece, so you'll need a copy of
the adventure to follow what I'm saying here.
Links to Previous Adventures.
The Adventure starts with the characters journeying to Bleakmarsh at
the request of their friend Godric. DM's could easily substitute
Bernard, (the druid NPC from,
Issue #1), as a link to that adventure. He fits the part of a swamp dwelling
hermit well and would probably trust the PC's to deal with,
The Beast.
You
could also link the adventure to the rebellion mentioned in Issue#1 by
suggesting the rebels are relying on armaments smuggled through
Bleakmarsh. The Beast could have the smugglers afraid to journey through
the swamps at night. Jonah, (the missing fisherman referenced in the
adventure), could instead be a smuggler, (a good excuse for DM's to stock
his abandoned boat with some interesting loot).
The Start.
Our first priority is introducing the characters to each other and
giving them a thread they can follow through the adventure. In this case,
we let them tell a story about how they earned their reputation as ,
'monster hunters', and inform them that they're currently on the trail of
another monster. I like kicking this adventure off by telling a simple
story - it connects the game to the broader tradition it has grown from.
The
next priority is to introduce some action. Rescuing Petra lets the
players roll some dice and explore their character sheets a little. The
monstrous tadpoles are CR1 and do 4d6 damage. This could be lethal at
2nd level and I'd be keen to telegraph that danger to the players. If
they ask about the presence of anything they
can utilize to reach Petra without entering the water, great, that's
the sort of creativity the encounter is designed to promote.
The
tadpoles also foreshadow the Weretoads at the heart of the adventure, (the first wave of spawn to stray beyond their lair in the
Shrine). You can play up their monstrous nature and the fact that they
are not familiar to any of the locals.
Bleakmarsh.
(ok, now what?)
The
town of Bleakmarsh is rendered in broad strokes. You have a list of
facts and rumors and a cast of characters through which you can pass
them to the players.
In terms of atmosphere, I'm going for something like
this. In reality though, it's probably more likely to come out something like
this.
The Mended Net Inn, provides a likely hub through which
characters can be introduced. Otherwise you can assume the NPCs are
plying their trade, (fishing in most cases), or enjoying the quietude of
their homes.
For prices and equipment in Agnes' smithy you can refer to pages 46-48 of the
Basic Rules or (145 & 149 in the Players Hand Book). You can decide what the smith of a fishing village might have on offer.
I
haven't specified the deity the church in town is dedicated to. You
could use the god of a cleric in the party to create a connection or any
god that best suits your campaign.
Here is a map of the area you can share with your players.
Hunting The Beast
In this adventure I don't assume which way your players will go or what will happen when. As DM you have the monster stat blocks and the facts in the zine and must decide how to respond to the decisions the player characters make.
If players seem lost, consider that all the gossip in town roughly points to three locations in the surrounding swamp:
1. Godric's hut
2. Jonah's boat (visible in the DM's version of the above map from the zine)
3. Bald Island
These,
in turn, lead back to either,
The Shrine, beneath the graveyard or
Marsha and Friar Seaton, (our secret Weretoads).
I aim to provide
multiple options to help DM's guide the session to a satisfying
conclusion whatever path the players take.
Here's three possible routes the adventure could follow after the first encounter:
Scenario 1
- The party head to Godric's for more information.
- They find the Gourd of Toad's Bane, and the book with the torn page in Godrics' ransacked home.
- They follow the tracks outside but a low roll only gives them the general direction.
- Asking around town about the book prompts Walter to come to them with the torn page.
- They confront Friar Seaton, a fight ensues and he flees to the Shrine.
- They track him there only to be surprised by the second Weretoad, Marsha, and the final confrontation begins.
Scenario 2
- The party go looking for the missing fisherman, Jonah, and spots his boat on a muddy bank.
- They follow his tracks to find his bloody remains being devoured by Pollywugs.
- Combing the area they find the Pollywugs tracks and trace them back to the shore opposite the grave yard.
- They hire Marsha to ferry them across.
- Within the Shrine Marsha transforms and attacks. The party have no
counter to the Weretoad's immunity and are already a little beaten up
from the Pollywugs so the DM decides to leave the second Weretoad out
rather than risk a TPK.
Scenario 3
- The party hear rumors that Marsha was out on Bald Island. They steal a boat. and head out there.
- They uncover the church's silver buried in the mud.
- They return to town and publicly accuse Marsha.
- Friar Seaton tries to deflect things but a good insight roll makes his motives clear to the party.
- There is a fight with both Weretoads in the middle of town but,
using silver candles sticks and spells, the party drive them off.
- The party ask Agnes to smelt the silver to edge their weapons and she begins work.
- Weretoads AND Pollywugs lay siege to the smithy with Agnes racing
to produce the necessary weapons for the party before it's too late.
Keep in mind that we WANT to give the players
information and are simply waiting on them to create opportunities for us to supply it.
Even failed rolls could point towards places where
more information can be gathered. For example, failing to track the
Weretoads may not lead straight to the shrine but perhaps the party
gather that the tracks were moving toward town before they lost the
trail.
If you need help moving the plot forward, the
Weretoads can always strike at the party, or one of the NPC's, and
then run away to
The Shrine, providing a fresh trail to follow
The Shrine.
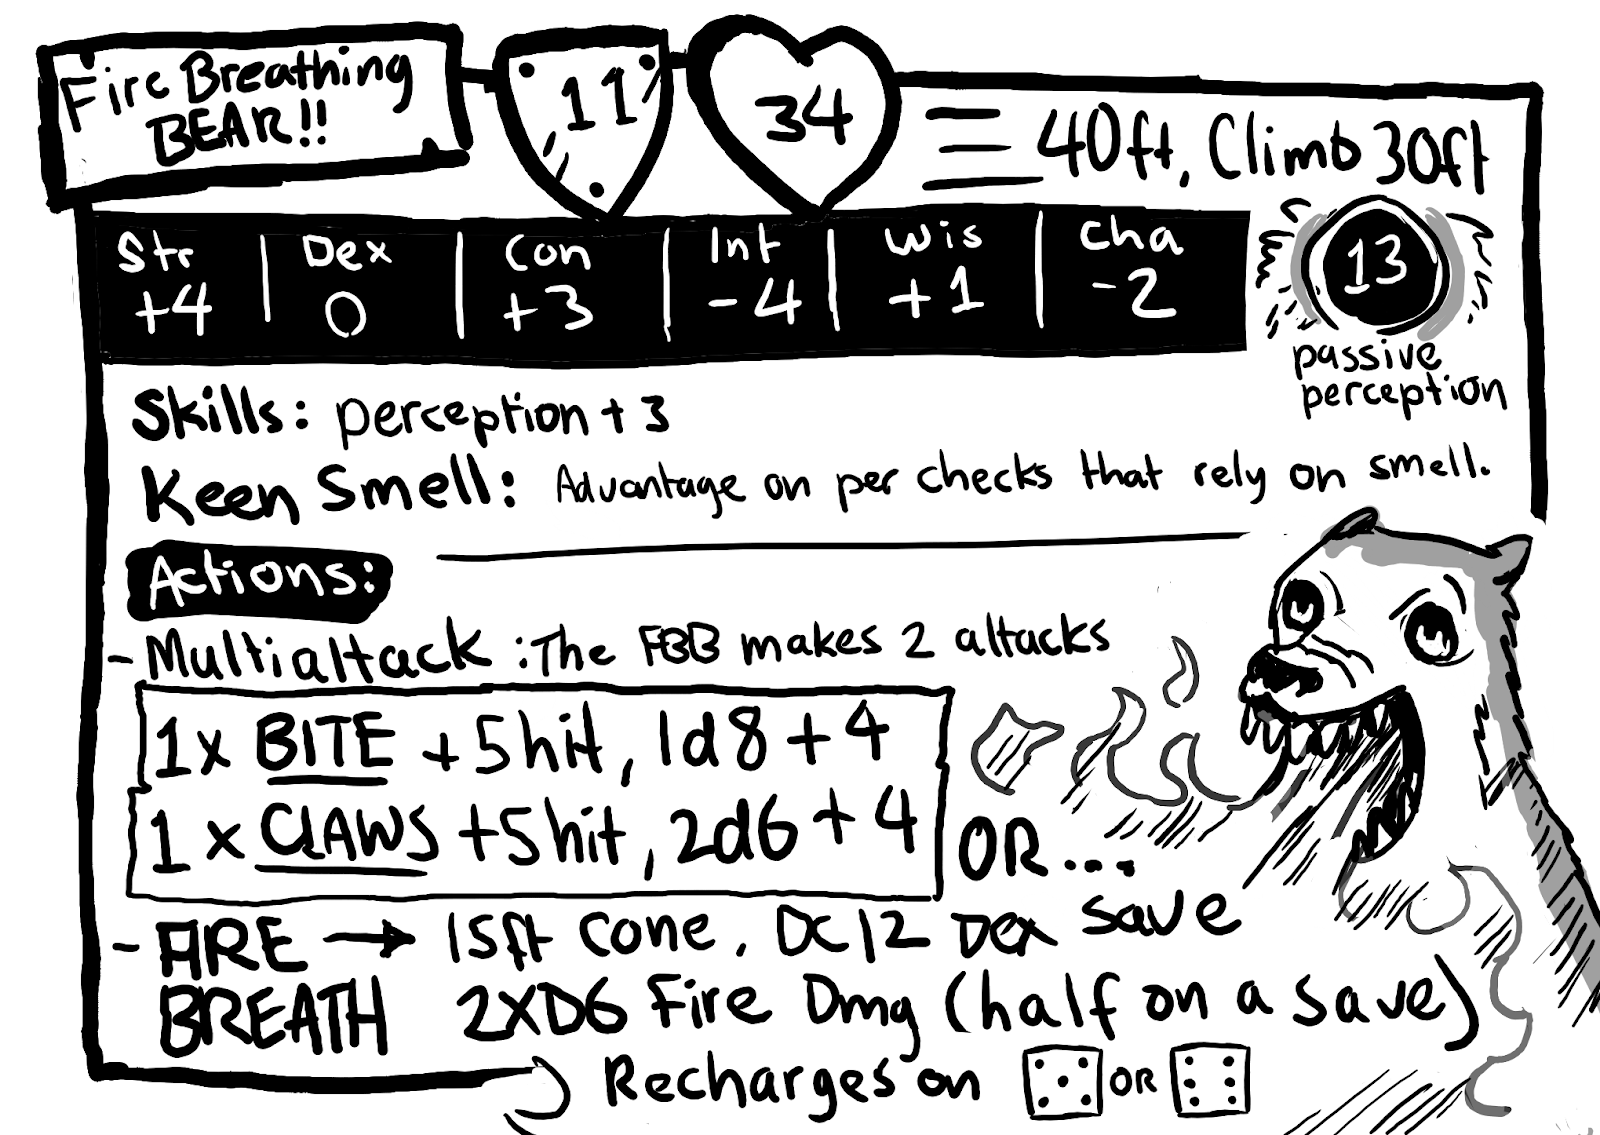
The
Weretoads are around CR2. Two of them make for a deadly
encounter for a party of four level2 characters. Without a way to deal with their immunity to
conventional damage the party are likely to be in trouble. Keep this in mind when
considering when to initiate combat.
The Shrine may be
the logical place to stage a climactic battle but if the party are
unprepared consider having both Weretoads tending to things elsewhere.
Godric can reveal their identities and help you set up a more survivable
final showdown. Or you can roll initiative and let things take their course,
it depends on what kind of game you and your players enjoy.
Inversely, if things are looking a little too easy, you can always hatch some of
the eggs and re use the swarm stat block from the start of the
adventure.
If you would like a combat map for The Shrine here you go -
 |
| (Players drop in from the bottom left) |
TREASURE:
Apart
from the Church's silver there isn't much loot on offer in the zine so
here are some potential rewards for party's who manage to slay the
beast.
The Grateful Dead
Shortly
after the death of the Weretoads skeletal hands of dead adventurers
rise from the water clutching strange gifts in their bony fingers
- The Priest's Partisan (Magic Spear. Requires attunement by a divine caster or monk)
Any hit made with this spear against a creature that is invisible counts as a critical hit.
- Blade of the Sentry (Magic short sword)
One
side of this blade reflects the bearers surroundings ten seconds into
the future. The other reflects them ten seconds into the past.
- The Diamond of Doggerel (Requires attunement)
You gain
advantage on deception checks providing you make them whilst rhyming.
There are a number of precious stones in the band of this necklace equal
to the number of players around the table. A majority of them light up
when the necklace deems the rhyme sufficient to grant its power to the
wearer.
- Ring of Borrowing, (Requires attunement).
Once a
day you may touch drinking vessels with another humanoid whilst
proposing the following toast, (inscribed inside the band),
"May the drink be as strong as the strength in your arm."
If
you both drink you gain one of their skills or
proficiencies for one hour and they lose it, (as long as it can
reasonably be performed with a single hand). Your bonus for this ability
is exactly as if it was performed by the person you borrowed it from.
Glyph Snails
Snails crawl in and out of the dark wet places in the shrine. The observant may notice their silvery trails form incomplete arcane symbols.
These are
Glyph Snails. You can feed up to four of them an arcane scroll, (a process that takes about an hour), they will then trace the spell out as a glyph as soon as they have the space to do so, (as per the
Glyph of Warding spell excluding the
explosive runes option).
It takes them about ten minutes to lay out the glyph and 7+1d4 days before they can make another. If you feed them another scroll it will change the spell they cast.
It is important to keep them confined to prevent them casting glyphs at random and NEVER let them near your spell book.
Players can find up to 2d4 Glyph Snails crawling around the shrine.
That's about it.
I can imagine the shrine opening to a large spiraling stair down to the rest of the temple, (buried under the mud at the bottom of the lake), but that probably deserves its own blog post.
The next dungeon I'll be discussing however will be the one from Issue#3,
Call of the Catacombs,
I'll see you then.