Thursday, December 17, 2020

Issue#6 Flaming Fandango in Faratusa

  Issue #6 Flaming Fandango in Faratusa

Well here we are - it’s the closing moments of 2020 and I’m spending my last spell slot to cast ZINE one more time.

I’m really not sure how many of the kickstarter backers out there found their way to these blog posts but if you’re one of them - thanks for taking a punt on these odd little adventures, I hope they’ve brought you and your players a lot of joy.

Let's roll up our sleeves and look at what we’re dealing with in Pocket Sized Perils Issue#6  Flaming Fandango in Faratusa.


Connections to other adventures

Since the hook in this issue revolves around a macguffin, (The Salt Ember Crown), the simplest way to link it to other adventures in the series is to change that macguffin. Here’s three options

  1. You can this link this adventure to Issue#5 Echoes of Ebonthul, by making the macguffin a piece of ancient technology the party brought back from that adventure - something that will protect the port of Faratusa from the threat of The Fire Chain Pirates. Perhaps Sir Aroldo has somehow swindled it off them and used it to weedle his way into the Governor’s good graces?

  2. If your group are interested in The Resistance’s struggle against the evil Baron touched on in Issue#1, you can make the Mcguffin a high tech weapon the Baron is trying to acquire from The Governor of Faratusa, or even a hostage NPC artificer/inventor being forced to design weapons. The masquerade ball can be reframed as a celebration of their successful deal and the The Fire Chain Pirates can be allies of/working for the Baron, (who never buys anything they can steal).

  3. If your group got pulled into some other realm in the final confrontation from Issue#5, The McGuffin can become something that might allow them to travel back. This requires reflavouring Faratusa as some sort of floating island port in whatever astral void the ritual at the end of Issue#5 lead them to.(I actually did this with one of the play test groups and it provided a lot of fun).


Now let’s jump into the zine itself.

The Hook


As always, the purpose of the first page of the zine is to set up the hook and get the imagination train rolling. We’re being a bit lazy here and letting the players fill in the details for our Mcguffin, (The Salt Ember Crown), and a potential ‘antagonist’, (Sir Aroldo Tuft). I’m trying to open up more and more of the creativity in my game to my players and this approach reflects that by letting them decide ‘why’ their characters are invested in this quest rather than me supplying them with a motivation.

The Plan

Once we know what we’re seeking and why we dislike Sir Aroldo so much we jump into planning our heist.

Page two feeds us a little background on the Governor and their obsession with constructs and gives us a narrow window to concoct a plan.


Depending on your group the time for planning can really blow out. This isn’t a problem if everyone’s having fun but if you want to keep things moving consider breaking up the planning into phases. One of my favourite mechanics from John Harper’s very slick, Blades in the Dark, system is the ‘flashback’, whereby players can step out of the flow of play for a moment to retroactively insert a bit of planning they ‘prepared earlier’. We can do something in that spirit for our adventure by letting the party plan in increments from objective to objective. When the party succeeds in getting the governor’s key or getting the crown you can give them another brief huddle to decide what the next phase in the plan is (and always was).

In the interest of keeping this closer to a one shot sized adventure, I've opted to start in media res with the player characters already in the building. If you don't mind things potentially running longer you can have them plan their way in, (just put guards on the gate and front door, a look out on the tower and roll for patrols everywhere else).


The Map


The specifics of the environment are important to this sort of adventure so this map (on the back of the zine) is intended to be shareable with your players. I’m trying to put more information in their hands and cut down on the need for detailed explanations from you as the DM


There’s more rooms and areas than are likely to be interacted with in a single play through to give the group a lot of room to plan their approach and also create opportunities for the architecture to play a part in the adventure via windows, stairwells, balconies and so on.


Perhaps the most notable ‘extra’ feature is the tower containing the recharge and repair stations for the Governor’s constructs. How is this meant to impact the adventure? I don’t know! It’s a bit of idea bait for your players. Perhaps they want to try sabotaging something here to disable the Brass Servants? Or maybe they’ll attempt to dress up in spare parts and impersonate them? Whatever the party may offer here, ask them to describe what they would like the result to be, identify the skill roll, (or rolls), you feel are required and follow where the dice lead you.


The Party


Hobnobbing with nobles in D&D is fun. In my experience players really enjoy getting the better of some pretentious aristocrat and watching each other put on their best, (or worst), courtly manners. Even before I knew a lot of other details about this adventure I knew I wanted it to include the opportunity for this sort of role play.


By placing the key to the vault on the Governor’s person we make it necessary for the player characters to mingle with the party guests to get it, (although they’re welcome to attempt to open the vault some other way).

In running this part of the adventure I would expect chaos and prepare to embrace it. The random table here is meant to assist you by providing some prompts for unplanned NPC banter.


The Security


On page four we meet our security detail. In this adventure I’ve opted for constructs to fill the roll of guards & servants, whirring and clanking down the Governor’s marble halls. The reasons behind this choice are

  • To add to the fantastic flavour of the adventure
  • To justify having one stat block for the entire mansion staff
  • The comedy element offered by role playing with -2 intelligence automatons
  • To avoid the discomfort of players choosing to murder flesh and blood servants who are just doing their job.


The Brass Servants are CR1. You’d need to get around 10 of them before the encounter turns deadly. I don’t give their exact numbers in the zine, (much like storm troopers in The Death Star, I imagine there’s always more of them than the heroes want to deal with). Any combat with them early on should include the risk of more arriving.

If you don’t find them intimidating enough you could give them a trait similar to pack tactics, (something like ‘Clockwork precision’), and allow them advantage when they have an ally adjacent to their target. In general however, the Brass Servants are meant to be cannon fodder - there are deadlier foes further down the line.


The Score


If the party succeeds in getting the key off the governor and dealing with the guards in front of the vault then all they need to do is wind up the clockwork mouse and it will pop into a hole in the wall and unlock it.


This runs dangerously close to being a puzzle. It’s not much of a puzzle but it’s obscure enough that the players may get it twisted in which case you could use wisdom/perception and intelligence/investigation checks to try and point them in the right direction.

The Gold’lem


Cautious players will scope out the vault before entering and possibly spot the glyphs. Reckless players will not and will awaken the Gold’lem. The Gold’lem is an animated pile of treasure and is pretty much a faster and more heavily armoured version of a Gelatinous Cube with extra damage immunities. It’s around CR4 and deals a suitable amount of damage for something that a cautious group should be able to bypass entirely. It’s intended as a consequence for rushing in without looking.
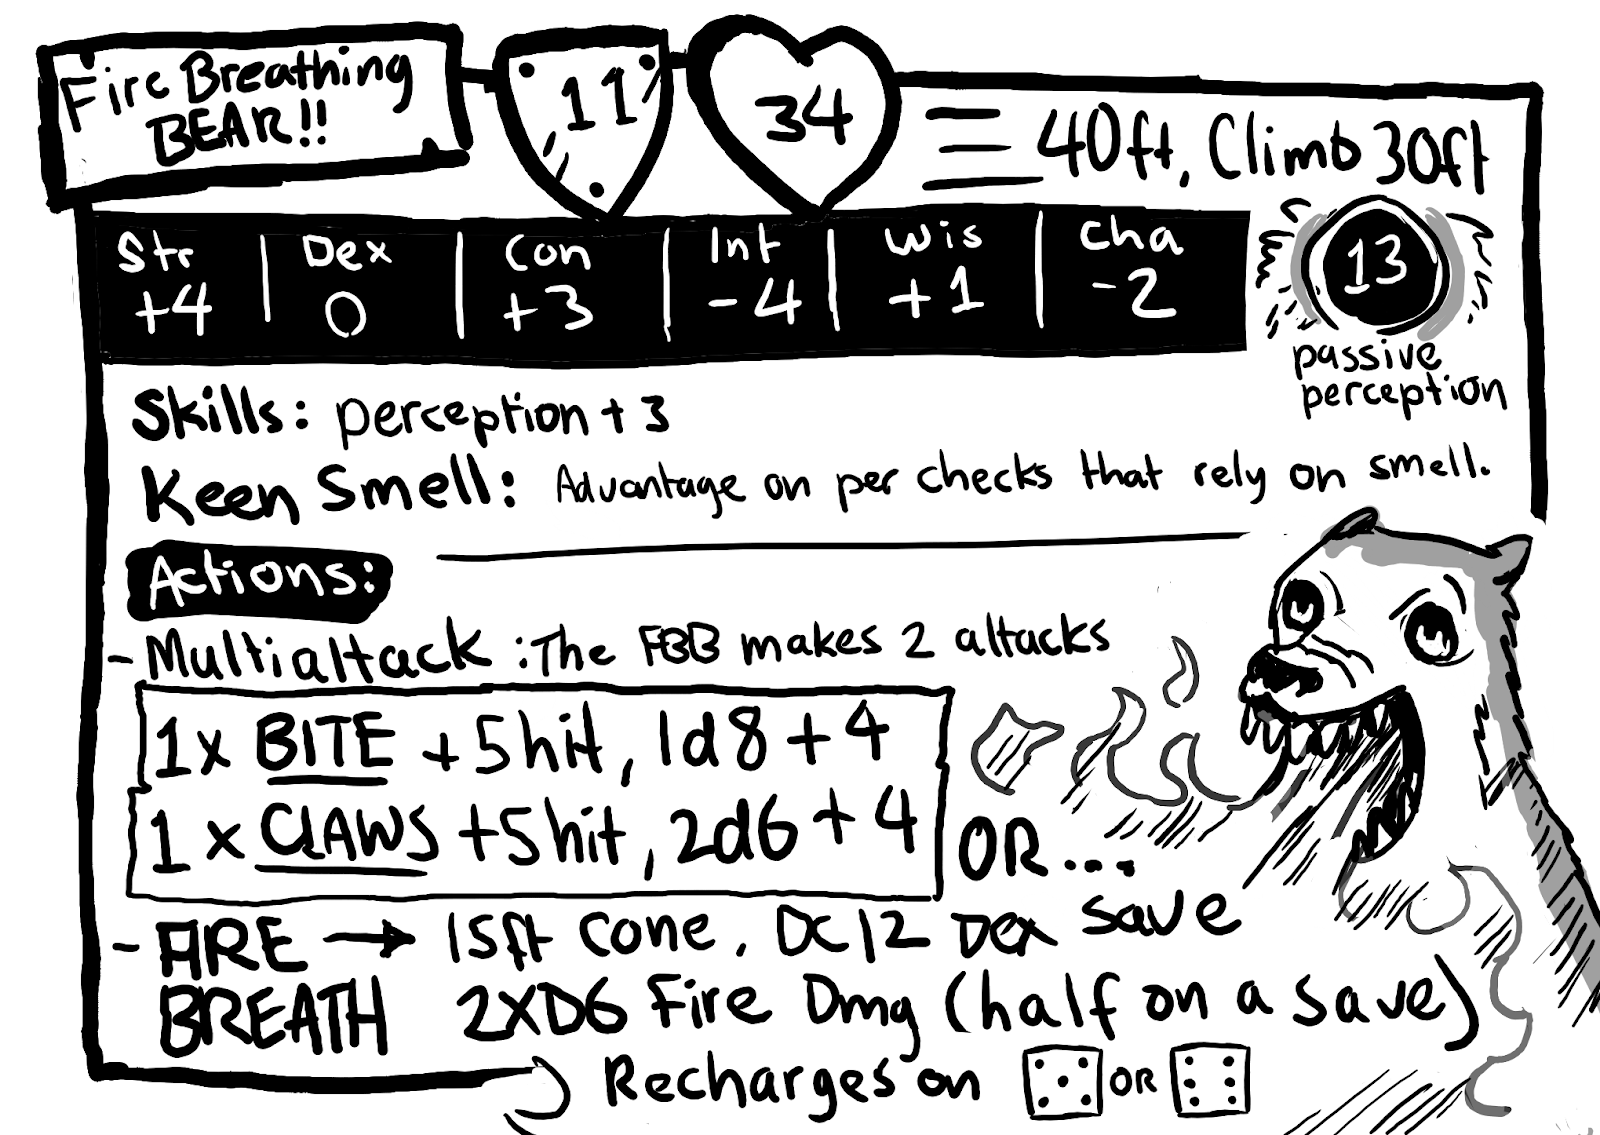
The Twist


I couldn’t finish a Dungeons & Dragons kickstarter without dropping a dragon on players at least once! Nagamerah is CR6, she’s essentially a young ‘white’ dragon with better mental stats and a climbing speed instead of a burrowing one to make her more classically a D&D Red Dragon.

If Nagamerah isn’t scary enough we also have some CR1 ninja pirates, with fire whips, jumping out of the crowd, one of whom is Aroldo, (our traitorous antagonist from page one).

This is a deadly encounter and, depending on how easy a time the party has had till now, it could be bad news for them. For this reason I'd suggest that Aroldo launches his coup when the party are still in the cellar or elsewhere in the mansion. This will give the group some space to assess the situation and decide how & IF they want to engage with it.

Beating the Fire Chain Pirates in a fight isn’t what the party came here to do - they came here to steal a treasure and embarrass Sir Aroldo. Depending on the situation they could attempt to sneak away with their prize…

However if the group decides they’d like to foil Arldo’s coup d'etat there are some elements they could try and exploit.

Rather than a pitched battle in the Grand Hall they could attempt to lure the Pirates or Sir Aroldo somewhere Nagamerah would struggle to follow (being a large creature).

There’s also Nagamerah’s chains. I only vaguely hint at lore for the Fire Chain Pirates in the zine but if we imagine them as airborne raiders, riding on magically bound dragons then breaking Nagamerah’s chains may turn her from a foe to an ally? At the very least she is likely to be a little upset at her former captors. Perhaps the last moments of the session will be a conversation with a dragon rather than a fight with one?

That’s it!


And so we’ve come to the end of this kickstarter. There’s still 14 more levels for D&D characters to reach and 20 more letters of the alphabet to cover but I’m going to take a short rest and roll some hit dice before I think about how I might go about that.

I’m keen to add some more generalised entries to this blog in the near future, (perhaps a bestiary and some loot tables etc), so stay tuned for that.

I’m also going to put the zines up for sale on Drivethru RPG and possibly Itch sometime in Jan so if you’re interested in that - that will be a thing.

To all of you who backed the kickstarter, ran the zines with your friends and sent me emails saying lovely things about them - Thank you, these adventures were small but the decision to share my creativity with strangers wasn’t, the supportive community out there made me really glad I took the plunge.

It’s goodbye for now but we’ll be meeting in a tavern to map out our next adventure before you know it.

Warmest Regards,

Brendan Barnett


Tuesday, September 29, 2020

Issue#5 Echoes of Ebonthul


Issue#5 Echoes of Ebonthul

Is anyone out there? It can be hard to know with lock down in my home state keeping us in our homes and in our heads, waiting for the day when we're free to rejoin the world. The people I used to see on a daily basis have become distant echoes and that counts double for strangers on the internet.

What was I talking about? Oh yes - Issue 5! It's done, so once again I'm placing the latest adventure in a little glass bottle made of internet and hurling it into the dark ocean of... ocean'y'ness?

Hooks

What's that? You want to know how to connect this adventure to the others? Well everything's connected...or nothing is... Let's see!
  1.  The Path of the Masked Mage, If you haven't resolved the mystery of the masked mage from Issue #1 this adventure provides a possible connection to that plot line. Lady Briarthorn had sent a another group to investigate the origins of her former captor but now that expedition has vanished. It's up to the party to locate them and find out what forces are behind their disappearance.

  2.  The Race is on! Sirona's library in Issue#4 is something of a time capsule - the perfect place to find a map pointing to the long lost island of Ebonthul. Unfortunately the scholar the party used to help translate it made a copy and set off on a rival expedition. They've had a weeks head start and if the party isn't quick they'll snatch up all the gold and glory for themselves.

  3. To the Rescue! If your party has become attached to a particular NPC in your campaign you could introduce this adventure by making them one of the missing persons whom the party are seeking.

As always choose a hook that will offer the biggest buy in for your table - now onwards to the adventure!

Pages 1&2 - A Start & The Sea monster!

These pages set up a simple hook for groups playing this as a one shot and then jump into some action. 

The Missing Adventurers

 I feel the elements of a game that players create themselves offer the greatest opportunity for engaging them. To this end the identity of each missing NPC is a blank space for your players to fill. This puts a little pressure on you as DM to weave their ideas into the session. For example - If one of your PC's is seeking a pious cleric with a drinking problem feel free to include a holy symbol and an empty bottle in one of the tents in the abandoned camp. 
 
The zine has spots for four missing adventurers; 1 Dead atop the statue, 1 hiding within the hold of the giant construct and 2 inside the Writhing Masses in the arcane engine room. You can always add more for larger parties by adding more Writhing Masses to the final combat or using an ancient diving suit to hide in the bilge of the giant construct etc.

The Sea Monster 


Once our missing adventurers are established we jump into the action. I like my players to occasionaly feel 'out of their depth'. Giant monsters can be good for that because they can be sooooo big they attack the environment rather than the party. This particular scenario is a bit of a bait and switch where we quickly replace our giant sea monster fight with a sinking ship skill challenge.  
 
The 'monster' is only going to stick around for two rounds but it's highly likely the party will sling some spells and abilities at it. To help with that here is a quick and dirty stat block.


After putting a hole through the parties ship the The Guardian dives out of sight, its task of keeping the interlopers away from Ebonthul accomplished. The possibility that it could reappear at some point  should instill a little fear in the group and add some tension to our adventure. 

A quick side bar on Armour & Swimming.

Logic suggests any character in armour that falls overboard is likely to sink like a stone. However it also suggests that a character is unlikely to be strapped into their armour whilst sailing. So do we drown our fighters and paladins or steal their plate mail? 

If it were me I'd risk losing the armour over the character. Then I'd place some armour within the abandoned camp for them to find. It could even be a mithral chain shirt or something similar belonging to the person they're seeking or that has been recovered from the ruins.

Page 3&4 Map of Ebonthul

Whether your party saved their ship or washed up exhausted and half drowned there are four locations for them to investigate within the ruins:

1. The Abandoned camp (Confirmation that our missing adventurers were here)
2. The Ziggurat with it's star covered door (A simple puzzle for the players to unlock) 
3. The Pit (an alternate way into the ziggurat)
4. The Statue (The key to the ziggurat and a clue to the fate of the missing adventurers).
 
Consider putting a telescope within the camp for them to find and through which they can examine the other locations nearby. This allows you to feed them a bit more information and guide their decisions about what to investigate next.

 Page 5 The Pit

Here I'm trying to offer the party an open ended challenge.  It's unlikely the entire party will have a high enough constitution to get through the flooded tunnel without drowning, (unless they find an air pocket). This is meant to prompt creative solutions from the players. There are  spells and other abilities that could negate this challenge and that's fine too - it just means a member of the group has a chance to shine and spends some resources ahead of the final combat. 
 

Page 6 The Statue 

The other way into the ziggurat is through the front door and that means climbing the statue, (although the party can't initially know this).
 
Falling from the top of the statue at level 5 could easily mean insta-death. This is intentional. The group don't necessarily have to climb the statue to progress through the adventure so this scenario lets them decide their own level of risk, (just be certain the players understand that risk).
 
As with the pit, the party may devise a way to reach the top in relative safety or their prepared spells and abilities may offer a shortcut. Either way their reward  is the sixth gem from the ziggurat door and the dead body of one of the missing adventurers. I've suggested rolling to see which invented NPC this is to maintain impartiality but go with your instincts on how the various players in your group will respond to having an NPC they just created killed 'off screen'.

Speaking of the dead body - There are lots of ways the clues sprinkled through the adventure could be interpreted. I'm going to offer you one sequence of events below but feel free to invent your own.

The Dead Sailor's Tale


You and your companions have arrived at the fabled island of Ebonthul. You're here to uncover lost treasures and make your fortune. Spirits are high as you make camp amongst the ruins.

As the days progress you can't shake the notion that a distant voice is talking to you, just beyond the edge of hearing. The effect is strongest in the shadow of the massive statue on the eastern edge of the ruins - the dark stone it holds aloft seems to swallow the light.

The leader of your expedition orders the stone retrieved from its lofty perch. The nimblest among you climb the statue with pitons and rope and manage to lower it to the ground. Many want to return home with this prize but the expedition leader claims greater treasures still remain and persuades the crew to stay a few days more.

Below the ziggurat you find the machine. Many are loathe to approach it, (not certain it isn't in fact a living beast), but your leader is unafraid. They seem strangely familiar with the instruments  within and order the stone brought aboard  - for safe keeping. 

Horror beyond horror - you have seen your companions transformed into monsters! You have glimpsed the writhing terrors nested within that accursed rock. You fled, taking the sixth star from the door and sealing them all below. You cut the rope on the winch that descends into the pit lest they try and follow you that way. Desperate for safety you climb into the palm of the statue where you cannot be easily surprised. The wound in your side throbs as your frantic pulse beats in your temples - the last thing you see is the stars wheeling overhead.

The Back Cover

On this page I give you a tiny random table to flesh out the setting a little. I imagine Ebonthul as the ruins of some sort of 'Future-Past'. The elements included here are trying to evoke a sense of familiar technology with a fantasy twist.

The Fold Out

So the party have made it into the ziggurat! We get a twist in our tale and discover the monster that attacked their ship is actually a gigantic construct. The conclusion of our adventure awaits inside...


 The Cargo Hold

Here we have 'treasure' and a missing adventurer hiding from their companions. 
 
This NPC's sanity is likely to be near breaking point and the party may have to work to get straight answers out of them, (You could give the player character who knows them advantage to do so). 
 
I haven't told you how much treasure is present here so the question is - How much treasure do you want your party to have? 
 
Level 5 is the beginning of the next tier of play as the party move beyond local adventures and start  playing a larger role in world events. Giving them some funds could help set up the next phase of your campaign and invite them to make some longer term plans. Remember though, instant fortunes don't go unnoticed.

Whatever GP value you decide to set for this horde here are some unique items you can include for added flavor.
  1. A highly sensitive Talking Mirror that makes all history checks with advantage but needs to be convinced that you'll appreciate the information before telling you what it knows.  

  2.  A Clockwork Bird that can be used to deliver short messages as per the animal messenger spell.

  3.  An air tight stone jar full of 'Red Sand'. If placed near a tiny, non magic, non living object for one minute the Red Sand will rearrange itself into an exact duplicate of that object, (this property doesn't function in darkness). After one hour both the duplicate and original disintegrate into red sand. The amount of sand and the size of object it can imitate increase with each use, (small to medium to large and so on). Keep it away from light! There are entire worlds that are now nothing but giant deserts of red sand.
     
  4. The Coral Crown. Whilst wearing this crown your clothing and hair billows as if underwater and illusory fish swim through the air around you.

  5. The Qinggong Spear (magic weapon - requires Attunement)
    Whilst wielding this item you can use the dash action to move in any direction, (including vertically). To change direction during this dash you must make contact with a piece of solid terrain such as a wall, rock, tree branch etc. If you are in mid air at the end of your turn you fall.

  6. The Mask of the Magic Eater (3 charges - requires attunement)
    When a creature you can see within 60ft casts a spell, you can use your reaction and 1 charge to force them to make a DC 13 constitution save. On a failure they take necrotic damage equal to 1d6 + the level of spell cast and you regain hit points up to the same amount.

The Control Room

This is the operational heart of the construct but I've disabled it so that your players don't drive it out of the adventure. If the party want to take control of this wondrous machine they'll have to deal with whatever is draining the power and that means heading to...

The Arcane Engine Room 

Here we find some creepy aberrations doing some crazy magi-tech stuff with a shiny black crystal. This ritual happens at the speed of plot and is always 5 rounds away from finishing at whatever point the party stumble across it.

I've put some curly mechanics into this fight so lets break them down.

The Writhing Masses are here to protect The Stone and hopefully buy enough time for its lair actions to make things interesting.

The Stone is the center piece of the encounter. If the PC's can destroy it whatever evil thing is happening here stops happening (more on that later). Be sure to use the spreading cracks and other details to communicate to the players that they are on a timer.

The stone has two things it can do to try and protect itself

  1. Pull characters from the engine room into it's weird demiplane.
  2. Spawn Passengers there to attack them and maybe cross back with them to the engine room if they make their next save.

You can describe your demiplane in any way that suits your game. In mine an alternate version of the engine room floated in a starry void amidst various 'flotsam' from the material plane. The Astral Sea or Limbo from DnD lore are closest to what I imagine.

The Passengers personify the threat the stone represents  - they don't just want your blood, they want your identity! I've built them to go down easily but become more of a threat each round.

I would spawn them in within movement distance of PC's but not so close as to force opportunity attacks if the PC's try to seek a better position.

The Passenger's Dark Mimicry trait causes attacks against them to have a 50% chance of hitting any PC they're grappling but what if more than one Passenger is grappling a character? I would play it something like the Mirror Image Spell  and assume the chance of hitting a PC diminishes the more monsters are grappling it, (this situation is already dangerous enough).

What if the party try to damage the machinery instead? 

One of my groups always looks for shortcuts and opted to smash the machinery 'charging' the stone in order to stop the ritual. This is the kind of creative thinking I don't want to discourage so I had to choose how to handle that.

If you like you can arbitrate the effects this might have in your game on the fly OR you can assume an attack on the machinery is an attack on the stone using the same AC and hit points  but narrating the effects as if it is the surrounding technology taking the hit (shhhh don't tell the players).

Victory 

If the party destroy the stone within 5 rounds then disaster is averted. They have a marvelous machine  full of treasure and have probably found the people they came here to find. The Guardian may or may not be in working order after the fight (and depending on what you want for your campaign from this point).

Defeat

In the zine I note that the end result of the ritual is the entire island of Ebonthul being transported to the Stone's nightmarish pocket dimension.

But why? What do the forces within the stone gain from this?

Here's one possibility for you to consider -

Long ago the mage-priests of Ebonthul destroyed the world! Not the world the party knows, not exactly, another version of it. So they tried to fix it by splitting reality in half. Now there were two realities. The one they broke got sealed away inside the stone along with all the nasty things that show up when you permanently damage the fabric of space time. The other world got to continue on as if the apocalypse had never happened. It was genius really - providing the nasty things never figured out a way to cross over and reverse the process...

So there you have it - either the party are triumphant and rich or they have some plane hopping craziness to endure to make it back home and set things to rights.  

I myself have one final battle to set the world of kickstarter to rights with Issue#6 Flaming Fandango In Faratusa - I'll see you then!


Saturday, July 25, 2020

Issue#4 Death in Dinglebrook


Issue#4 - Death in Dinglebrook.


The mists have parted to reveal Pocket Sized Perils issue#4! When I launched the kickstarter this adventure was just a title and a few loose concepts. I've kept turning ideas over in my mind as I polished off issues 2 & 3 and what emerged was something a little more lore heavy than the other adventures - In Dinglebrook the players blunder into a story that started before they arrived and to which they may be the conclusion.

Before we get stuck into the zine itself I want to give you...

A quick heads up.

As I write this the world is still dealing with the ramifications of Covid19. Themes of disease, death, quarantine and isolation have all found their way into this adventure. They come wrapped in relatively lighthearted fantasy tropes but if you think  anyone in your group mightn't be in the mood for that put this zine aside for when folks are in a better place to enjoy it.

also...

This adventure revolves around the story of a crazed healer who has trapped an entire valley in perpetual isolation from which the player characters must escape. With that sort of synopsis it may seem like I'm making some sort of statement about current events - I assure you these plot points are there to serve the needs of game of D&D and NOT convey any particular message at all.

If all of the above sounds OK to you than read on for a breakdown of the adventure.

Links to previous adventures.


Here are some ways to connect this adventure to others in the series.

1. If one or more of the party contracted Buffontrhopy (weretoadism) from Issue #2 or 
Toxodiabolous from Issue#3 that could be the rare affliction for which they are seeking a cure.
 (Hmmm maybe it's not just this issue that I seem preoccupied with disease?)

2. Lady Briarthorn, (or another notable NPC connected to The Resistance), has been poisoned by a slow acting and insidious toxin that defies all attempts to remove it. The only hope is the healing skills of the legendary Sirona.

If you've been playing through the adventures with the same players and characters then your group has it's own shared history by now. That means whatever hooks you come up with are probably going to serve you better than ones I can supply. Use these if they work for your group but don't be afraid to introduce your own ideas.

Now let’s open the zine and see what we're dealing with. 

Page 1 (introduction)


Our first job is introducing the characters at the heart of the story and letting the players know that they're allowed to make stuff up.

Since the Abbey is supposed  be a place of healing we assume healing is what the player characters are seeking there.

The 'Rare Afflictions' give new players something to start with when role playing through the session.
If your players struggle to come up with something on the spot here is a random table to help.

Rare Afflictions:

Roll 2 d10 and let the player pick one result to decide their character's affliction. It takes effect whenever they roll a 1 on a d20 roll.

1. Instantly float 1d10 feet upwards as per the levitation spell (the effect persists for 1min).

2. You grow a demonic eye in your forehead that casts scorching ray at three random creatures before disappearing.

3. You Grow 1d20 mushrooms on your body

4. Part of you glows brightly for 1min

5. An object you touched in the last 10mins is now a mimic.

6. You teleport to a place within 30ft (Dm's choice)

7. You sneeze summoning 1d4 sprites.

8. All beasts of a certain type (cat/bird/frog etc) within one mile are drawn to you for one hour.

9. You instantly cast awaken on an object you are holding or wearing - it doesn't like you.

10. You exude slippery grease for 1min any dexterity checks or saves you make are at disadvantage and other creatures are at disadvantage when attempting to grapple you.

Page 2 Thin Jim's


Four adventurers walk into a bar...

Thin Jim's is an RP encounter that could be mistaken for a combat encounter. The Skeleton's are the NPC villagers of this adventure, (trapped in un-death by dark forces). This sets up our paradoxical quest  - Can the PC's save them, not from death, but from unending life?

The players are going to be on the back foot, (skeletons in D&D are normally for smashing). The Skeletons aren't going to be able to explain the situation right away so that uncertainty will persist.

It can be fun to have the skeletons perform welcoming gestures and shows of hospitality and watch the players try and figure out if it's a trap of some kind. I had particular fun serving the players top shelf liquor and having the skeletons watch them lift it to their lips intently - pining for the feeling flesh they have lost.

Some players will attack immediately and discover that these skeletons are effectively immortal as the broken fragments slowly knit back together. Throughout any conflict the Skeletons should remain focused on letting the PC's know what's actually going on rather than doing them any real injury.

Page 3 What's Going On?

This page covers the basic information for navigating the adventure.

But what if the players fail all their insight checks?

If the dice confound any effort to shed light on things I would just cut to the chase. Thin Jim can send a skeleton off for some parchment, (Probably hard to find given the general state of decay), and write the players a note to the effect of -

Plague.

Long time ago.

Sirona couldn't save us.

Went mad.

Nothing can leave.

Nothing can die.

Ring Silent Bell.

Let it be over.


Page 4 Stone Orderlies 


This IS intended as a combat; mainly so the players are aware of the stone fog effect ahead of any final battle at the Abbey and can employ tactics to suit. 

Of course the party can go willingly with the orderlies but it means they'll probably be marched straight to Sirona rather than getting a chance to try an alternate approach to the Abbey. 


But what if they all get turned to stone? 

The orderlies are here to fetch the PC’s. That doesn’t change if the party are all petrified. Consider having them wake up strapped to beds in the infirmary as Sirona makes preparations for their 'treatment'. Proceed cautiously here to make sure things stay fun. Give them their HP back, (Sirona is a 'healer'), and some time alone to figure out how to get free, (Mage hand? Familiars? Strength checks? etc).

Page 5 & 6

No Stone Left Un-Turned

When I play tested the fight with the Orderlies I realised the issue with a 24hr petrification isn't what happens if they ALL fail the saves but what happens if only ONE person fails. One of my kind play testers ended up being sidelined whilst the combat concluded and her party members tried to figure out what to do with her petrified character. That sucks and so here is my fix:

Let them keep playing an invisible ghost until the petrification concludes! Let them help the others avoid the same fate and try and improvise around the 'Use An Object' action to get an advantage over the enemy.

This may not be as fun as using the full raft of abilities on their character sheet but it's a lot better than watching everyone else play the game you were hoping to play too.

It also potentially opens up some interesting possibilities in game play like passing through walls and scouting ahead or even gaining some insight into the magics at play in the adventure.

What Next?

Here I offer a further hook of the coach driver being dragged off whilst the party were in the tavern.

The coach driver doesn’t have much to establish their character but I’ve used them for three ‘functions‘ throughout the adventure.

- As a sort of ‘ferryman’ to the ‘Other-world‘ of Dinglebrook
- To further motivate players to head to the Abbey
-  To provide some clue as to Sirona’s intentions when they are later discovered in the infirmary.

My play testers actually prevented the Coach Driver being dragged off so don't feel you HAVE to make this happen. My instinct is that if you play the Skeletons as 'nice' most parties, (admittedly not all), will be invested in helping them without further prompts. 


Page 7  The Woods (back page)

Finding secrets is fun so here’s a secret. It  provides another point of entry into the Abbey and can serve as a reward for players who show an interest in exploring a bit further. I'd consider lowering the DC to spot the trail for any players who make a point of looking for tracks or watching the sides of the path.

Fold out

The Abbey 


The back corner of the Abbey is obscured on the map in the zine - here is something to fill that gap in the floor plan;


I've placed Sirona and three Orderlies on the  map. The Orderlies are around CR1 and Sirona is around CR4 so facing off against her and three of them at once pushes beyond deadly for 4x4th level players. I'd be inclined to only place one or two Orderlies in the room with her and have the others slowly reinforce if you need to increase the difficulty. Remember - 'death' can mean 'capture' in this context.

Here's a d6 table of events that you can use to give The Abbey some dynamism.

Things that can happen

1. A patrol of 1d4 Ordelies returns or departs
2. A friendly skeletal rat appears from a hole in the wall.
3. An accident in the lab causes thick smoke to heavily obscure the area for 5mins
4. Sirona is served a lonely meal by the orderlies in the dining room.
5. Sirona goes to pray over the bones in the ossuary.
6.  The ghost of a monk, (riddled with plague sores), appears and gestures for the party to follow,(maybe the clapper for the bell is with their remains in the ossuary?)

Facing Sirona.

Sirona is obsessed with restoring all the inhabitants of Dinglebrook to life. The enchantments she has woven about the valley are all pointed at keeping their souls trapped until she discovers the means to restore their bodies.

To Sirona's mind the PC's are already infected with plague and only living petrification can prevent their death.

She may try to be gentle with them or allay their fears but ultimately it is her sacred duty to cure them for their own good. That's not to say the PC's couldn't possibly negotiate a peaceful resolution to the adventure - only that Sirona's obsession makes that a difficult path.

Sirona's clones are designed to force adaptation from the party in the final encounter. EG Firebolts may bring this version down easily but they'll fail to damage any other clones that emerge etc. Players may try to incapacitate Sirona or trap the clones in their cells or any number of other improvisations.

If at any point a PC finds the clapper to the silent bell and rings it you could immediately dispel whatever animates the Stone Orderlies whilst allowing an enraged Sirona to fight on - having failed in her  mission to 'save' the town.

Loot

For victorious parties Sirona's Lab is the most likely place to find valuable stuff. Here is a small list of possible rewards

1. Minor Healing Potions (always handy)

2. Plans for a magical, diamond powered, defibrillator that any class can use to cast Revivify once per day providing they supply the material components. However the research is incomplete - At the end of any day spent researching the device a character with proficiency in arcana or tinker's tools can make a DC18 check with either skill. After three successful checks the device is complete.

3. A book describing how to cure their rare affliction BUT they need a rare ingredient that comes from a dangerous place or an even more dangerous beast!

4. A book describing how to CONTROL their rare affliction as a once per day power BUT it requires an ingredient from something incredibly dangerous.

5. Vials containing live cultures of a failed experiment in returning the townsfolk to life. Don't drop it! (Credit to Zee Bashew here.)

The End.

The ending of this adventure can be bittersweet. If they ring, The Silent Bell, the party will find the town quiet, the bones of it's inhabitants finally still now that their souls have been released. The party have done them a great service but there can be a little note of sadness in that victory.

...

That's it! Thanks for waiting on this one as I caught up on things and ironed out some kinks. Now I'm off to try and make my deadline for Issue #5, "Echoes of Ebonthul!"


Sunday, May 24, 2020

Issue#3 Call of The Catacombs


Is it Issue#3 already? Yes, which is why you're here, (unless you're lost), so lets talk about it.

Call of The Catacombs is a mini dungeon crawl with as many cat references as I can squeeze in. Sometimes an adventure is an effort to capture some elusive concept or set of ideas and sometimes it's just a response to the question - What if some kobolds started worshiping a magical cat? I try and bury the lead a bit so the players can have an, "Ah-ha", moment whilst exploring the 'Cat'acombs.


Links to Previous Adventures
Here are some options to link Call of The Catacombs to previous Pocket Sized Perils adventures.

  • Under Siege
    This city is a stronghold for the rebellion mentioned in Issue#1 and is currently besieged by the Baron's army. It wont last long if the supply of fresh water isn't restored.
  • A Gesture of Good Will
    The city has yet to take a side in the rebellion. Dealing with this issue might win the town council to your side?
  • Trail of the Masked Wizard.
    The Baron is clearly allied with dark forces. Tracing these occult machinations has lead you beneath the city. Perhaps the masked wizard from Issue#1 came through here either before or after encountering the PC's.
  • Reckless Archeology
    The shrine under Bleakmarsh, (Issue#2), was opened by an archeologist who passed through. Afterwards they took a boat downriver mentioning something about a, "promising lead in the city". You should catch up to them before they dig up more trouble. 
Whether you use one of these hooks, one of your own or run the adventure as a one shot; we begin in media res with the PC's sloshing through the catacombs under the city.

Below is a breakdown of the Zine. It doesn't have one big map with all the rooms arranged in relation to each other so, for context, here is that map.


Pages One and Two - Entering The Dungeon

These pages answer the question 'Why are the players here?' (ie to deal with the contaminated water the city wells are currently pumping) and then ask another...

'How do the players get into the dungeon?' 

I like it when problems have more than one solution. Ideally players should be able to improvise solutions that the game master hasn't anticipated. This page presents two paths,  'Go downstream' or 'Try and find the entrance'.

The first prevents the session getting stuck if the players can't locate the door. The second throws a few more possibilities at them. They can negotiate with Skrip or the Guard, locate and force open the secret  door, or come up with something unique.

For example, I put a pipe in the picture the guard can use to drop 'Furballs' on unwelcome guests. Where does that pipe go? I don't know but maybe it goes to the tunnels on page 3?
If a player proposes something interesting go with it because that's the game you want to play, (not the one where they have to guess what you decided before hand).

There's also Kobolds here...

Skrip is a handy tool to help the player's find a way in and give a few clues about what's going on.

My instinct for the motivations of the other kobolds, (including the guard), is that violence isn't their first choice but it's definitely an option.

Page 3 - The Tunnels

D&D lore associates Kobolds with elaborate underground tunnel systems. That sounds fun to me but mapping out a really complex tunnel network and constantly asking the players if they go left or right doesn't.

The random table on page 3 is my way of invoking the sense of a labyrinth without bogging the game down in minutiae.

There's a chance the dice will get the players 'lost' here. That's ok, we wanted to convey that this environment is tricky to navigate. Treat it as another open ended puzzle to which the players can provide a creative solution. Ask them what their character does to help the group find a way out.  Clever ideas could give them advantage or negate the need for a roll entirely.

Page 4 - The Canal

If the players go downstream from the start this is where they'll come out, (taking some damage in the process). You can describe the sound of rushing water and start calling for strength checks against the current to give them a chance to back out.

This space offers a lead on what's contaminating the city wells with kobolds periodically dumping waste from the overhead bridge.

Anyone who's paying attention may be wondering, "Hang on is this the sewers or the city's water supply? Good point. I envisage these catacombs as a kind of watery Rube Goldberg Machine, with the kobolds engineering all sorts of alterations on the original architecture. From The City's perspective that's fine as long as the water out of the pumps is drinkable. Perhaps the pump station's original purpose was filtration? If players demand a blueprint of the entire network including inflows and outflows... I'm sorry, I don't know how those are supposed to look and, chances are, neither do most characters in this fantasy world.

Speaking of the role of water in this dungeon brings me to...

"Toxodiabolous"

I've drawn on a few cat themed influences to build the dungeon. Toxoplasmosis is a parasitic disease that rats get from cat faeces. Essentially it makes them lose their fear of cats and associate the scent of one with that of a potential mate.

The weird, 'demonic influence', potential here is immediately obvious.

I couldn't fit them into the zine itself but some playable mechanics could add to the game so here they are:

Thursday, April 23, 2020

Issue #2 The Beast of Bleakmarsh


Issue#2 The Beast Of Bleakmarsh

Here it is, Issue#2 in the, Pocket Sized Perils, series. Of the three adventures I've completed at the time of writing, The Beast of Bleakmarsh, has involved the most work in fitting the adventure I envisaged onto the pages available.

I wanted this adventure to have the tone of a mystery whilst simultaneously functioning as a one shot that was playable in a single session. No mean feat as mysteries require subtlety and a slow build of suspense whilst one shots require you to cut to the chase.

Whether or not I succeeded in threading a line between those two, often contradictory, goals will be up to those who play the adventure to decide. Certainly, I am counting on Dungeon Masters to use their own skill to bring the town of Bleakmarsh to life and guide their group towards an exciting confrontation with the evil that lurks there.

This blog post breaks down my thinking around and beyond what I was able to include in the zine as well as providing some added resources for Dungeon Masters and players.

As with all my posts on the Perils series, this is a companion piece, so you'll need a copy of the adventure to follow what I'm saying here.


Links to Previous Adventures.


The Adventure starts with the characters journeying to Bleakmarsh at the request of their friend Godric. DM's could easily substitute Bernard, (the druid NPC from, Issue #1), as a link to that adventure. He fits the part of a swamp dwelling hermit well and would probably trust the PC's to deal with, The Beast.

You could also link the adventure to the rebellion mentioned in Issue#1 by suggesting the rebels are  relying on armaments smuggled through Bleakmarsh. The Beast could have the smugglers afraid to journey through the swamps at night. Jonah, (the missing fisherman referenced in the adventure), could instead be a smuggler, (a good excuse for DM's to stock his abandoned boat with some interesting loot).


The Start.

Our first priority is introducing the characters to each other and giving them a thread they can follow through the adventure. In this case, we let them tell a story about how they earned their reputation as , 'monster hunters', and inform them that they're currently on the trail of another monster. I like kicking this adventure off by telling a simple story - it connects the game to the broader tradition it has grown from.

The next priority is to introduce some action. Rescuing Petra lets the players roll some dice and explore their character sheets a little. The monstrous tadpoles are CR1 and do 4d6 damage. This could be lethal at 2nd level and I'd be keen to telegraph that danger to the players. If they ask about the presence of anything they can utilize to reach Petra without entering the water, great, that's the sort of creativity the encounter is designed to promote.

The tadpoles also foreshadow the Weretoads at the heart of the adventure, (the first wave of spawn to stray beyond their lair in the Shrine). You can play up their monstrous nature and the fact that they are not familiar to any of the locals.

Bleakmarsh.

(ok, now what?)

The town of Bleakmarsh is rendered in broad strokes. You have a list of facts and rumors and a cast of characters through which you can pass them to the players.

In terms of atmosphere, I'm going for something like this. In reality though, it's probably more likely to come out something like this.


The Mended Net Inn, provides a likely hub through which characters can be introduced. Otherwise you can assume the NPCs are plying their trade, (fishing in most cases), or enjoying the quietude of their homes.

For prices and equipment in Agnes' smithy you can refer to pages 46-48 of the Basic Rules or (145 & 149 in the Players Hand Book). You can decide what the smith of a fishing village might have on offer.

I haven't specified the deity the church in town is dedicated to. You could use the god of a cleric in the party to create a connection or any god that best suits your campaign.

Here is a map of the area you can share with your players.


 Hunting The Beast

In this adventure I don't assume which way your players will go or what will happen when. As DM you have the monster stat blocks and the facts in the zine and must decide how to respond to the decisions the player characters make.

If players seem lost, consider that all the gossip in town roughly points to three locations in the surrounding swamp:

1. Godric's hut
2. Jonah's boat (visible in the DM's version of the above map from the zine)
3. Bald Island

These, in turn, lead back to either, The Shrine, beneath the graveyard or Marsha and Friar Seaton, (our secret Weretoads).

I aim to provide multiple options to help DM's guide the session to a satisfying conclusion whatever path the players take.

Here's three possible routes the adventure could follow after the first encounter:

Scenario 1
  • The party head to Godric's for more information.
  • They find the Gourd of Toad's Bane, and the book with the torn page in Godrics' ransacked home.
  • They follow the tracks outside but a low roll only gives them the general direction.
  • Asking around town about the book prompts Walter to come to them with the torn page.
  • They confront Friar Seaton, a fight ensues and he flees to the Shrine.
  • They track him there only to be surprised by the second Weretoad, Marsha, and the final confrontation begins.

Scenario 2
  • The party go looking for the missing fisherman, Jonah, and spots his boat on a muddy bank.
  • They follow his tracks to find his bloody remains being devoured by Pollywugs.
  • Combing the area they find the Pollywugs tracks and trace them back to the shore opposite the grave yard.
  • They hire Marsha to ferry them across.
  • Within the Shrine Marsha transforms and attacks. The party have no counter to the Weretoad's immunity and are already a little beaten up from the Pollywugs so the DM decides to leave the second Weretoad out rather than risk a TPK.

Scenario 3
  • The party hear rumors that Marsha was out on Bald Island. They steal a boat. and head out there.
  • They uncover the church's silver buried in the mud.
  • They return to town and publicly accuse Marsha.
  •  Friar Seaton tries to deflect things but a good insight roll makes his motives clear to the party. 
  • There is a fight with both Weretoads in the middle of town but, using silver candles sticks and spells, the party drive them off.
  • The party ask Agnes to smelt the silver to edge their weapons and she begins work.
  •  Weretoads AND Pollywugs lay siege to the smithy with Agnes racing to produce the necessary weapons for the party before it's too late. 
Keep in mind that we WANT to give the players information and are simply waiting on them to create opportunities for us to supply it.

Even failed rolls could point towards places where more information can be gathered. For example, failing to track the Weretoads may not lead straight to the shrine but perhaps the party gather that the tracks were moving toward town before they lost the trail.

If you need help moving the plot forward, the Weretoads can always strike at the party, or one of the NPC's, and then run away to The Shrine, providing a fresh trail to follow   

The Shrine.


The Weretoads are around CR2. Two of them make for a deadly encounter for a party of four level2 characters. Without a way to deal with their immunity to conventional damage the party are likely to be in trouble. Keep this in mind when considering when to initiate combat.

The Shrine may be the logical place to stage a climactic battle but if the party are unprepared consider having both Weretoads tending to things elsewhere. Godric can reveal their identities and help you set up a more survivable final showdown. Or you can roll initiative and let things take their course, it depends on what kind of game you and your players enjoy.

Inversely, if things are looking a little too easy, you can always hatch some of the eggs and re use the swarm stat block from the start of the adventure.

If you would like a combat map for The Shrine here you go -
(Players drop in from the bottom left)


TREASURE:

Apart from the Church's silver there isn't much loot on offer in the zine so here are some potential rewards for party's who manage to slay the beast.

The Grateful Dead

Shortly after the death of the Weretoads skeletal hands of dead adventurers rise from the water clutching strange gifts in their bony fingers


  • The Priest's Partisan (Magic Spear. Requires attunement by a divine caster or monk)
    Any hit made with this spear against a creature that is invisible counts as a critical hit.
  • Blade of the Sentry (Magic short sword)
    One side of this blade reflects the bearers surroundings ten seconds into the future.  The other reflects them ten seconds into the past.
  • The Diamond of Doggerel (Requires attunement)
    You gain advantage on deception checks providing you make them whilst rhyming. There are a number of precious stones in the band of this necklace equal to the number of players around the table. A majority of them light up when the necklace deems the rhyme sufficient to grant its power to the wearer. 
  • Ring of Borrowing, (Requires attunement).
    Once a day you may touch drinking vessels with another humanoid whilst proposing the following toast, (inscribed inside the band),

    "May the drink be as strong as the strength in your arm."

    If you both drink you gain one of their skills or proficiencies for one hour and they lose it, (as long as it can reasonably be performed with a single hand). Your bonus for this ability is exactly as if it was performed by the person you borrowed it from.
 

Glyph Snails 


Snails crawl in and out of the dark wet places in the shrine. The observant may notice their silvery trails form incomplete arcane symbols.

These are Glyph Snails. You can feed up to four of them an arcane scroll, (a process that takes about an hour), they will then trace the spell out as a glyph as soon as they have the space to do so, (as per the Glyph of Warding spell excluding the explosive runes option).

It takes them about ten minutes to lay out the glyph and 7+1d4 days before they can make another. If you feed them another scroll it will change the spell they cast.

It is important to keep them confined to prevent them casting glyphs at random and NEVER let them near your spell book.


Players can find up to 2d4 Glyph Snails crawling around the shrine.

That's about it.

I can imagine the shrine opening to a large spiraling stair down to the rest of the temple, (buried under the mud at the bottom of the lake), but that probably deserves its own blog post.

The next dungeon I'll be discussing however will be the one from Issue#3, Call of the Catacombs,
I'll see you then.


Thursday, March 12, 2020

Issue#1 An Ambush in Avenwood


Issue#1
 Overview

An Ambush In Avenwood is the first in the Pocket Sized Perils series and my first attempt at a graphic mini adventure.

The zine assumes the dungeon master is familiar with the D&D 5e system with occasional details abbreviated or omitted to fit more adventure in.

However, the adventure itself aims to include first time players by touching on several recognizable tropes of the fantasy genre; daring rescues, mysterious towers, evil wizards etc. The intention is that these familiar touchstones will give a player who is new to tabletop role playing a ramp into the action.


Below is a break down of each page of the adventure. As with everything in the Pocket Sized Perils series the DM should feel free to alter, adapt or discard anything they find in this adventure if they feel it will result in more fun at the table.

If you don't have a copy to refer too this may not make a lot of sense. If you desire you can grab a 'pay what you want' copy HERE.

1. A Beginning.

Generating a common goal for a party can be tricky and there's endless advice and debate elsewhere about how best to do it. As this is a 'one shot' we're going to cut to the chase and unite the group under the banner of, The Resistance. This page is trying to do three things.
  1. Give the party a common goal.
  2. Give players a chance to think about their characters before the dice start rolling.
  3. Share the players ideas about their characters with the group to aid role play in the session.

2. The Ambush.

Often the first fight of any D&D campaign is an ambush, (consider the 5e starter set, Lost Mines of Phandelver). In, An Ambush in Avenwood, we're going to flip that trope and cast the players as the ones doing the ambushing. Role playing games are about player choices and creativity. This way we're giving them a chance to concoct a crazy plan; are they going to try chopping down a tree to block the path? Sneak up and take out the guards one by one from the back? It's up to them and we play to find out if their plans work.

However the wagon is on its way so they don't have limitless time to prepare. A time limit is going to stop the planning discussion from getting bogged down. After 15 minutes have the wagon come around the bend whether the characters are in position or not.

3. The Enemies.

Now we get into some combat. Our enemies are challenge 1/8th making this a 'Medium' encounter for a first level party of four. If you have more or less players in your group you can consider adding or taking away a guard. The terrain, the standard rules on cover and Ivan's, 'Bark Orders', action can all be used to keep the combat interesting but if the players have executed a particularly effective ambush there's nothing wrong with this being over quickly.

4. Bernard.

We follow our high beat with a low beat. This is a chance for some role play and an opportunity for the DM to feed the party info about the obstacles ahead. If they've captured a guard or two have fun playing a non player character who's having a very bad day at work. Bernard the healer lacks a stat block because combat isn't the function he performs in the adventure. He's there to reward the player's victory with some hit points and vital information. You could style him as a local cleric or druid to suit your needs. The Druid npc block from The Basic Rules pg.398  is a good fit.

5. The Tower.

This page covers a list of things the players may be able to find out about the end dungeon of the adventure. A successful ambush means the players are probably in possession of a few guard outfits and the prison wagon. This dangles the possibility of rescuing Lady Briarthorn using subterfuge rather than force. Once again we're giving the players a chance to be creative, (but only if it occurs to them to do so). As with the ambush we want to impose a gentle time pressure on any planning,  Lady Briarthorn is tough but perhaps she will reveal the location of The Resistance's hideout under torture etc.

6. Rewards 

This page is out of sequence so the fold out can be dedicated entirely to running the tower as an environment/dungeon without the need for further flipping. I've deliberately opted for rewards beyond gold and instead focused on options that connect your players to the world or open up potential hooks for future adventures.

Ambush in Avenwood does not end with The Resistance triumphing over The Baron's forces, (in fact, The Baron, never appears). Instead it leaves those threads for you to weave into a broader campaign if you so choose. Alternatively the adventure can stand alone with Lady Briarthorn's rescue serving as the conclusion to the story.

Fold Out. THE TOWER (again).

Getting In.
Unlike the first encounter of the adventure here the Guards are spread thin. I imagine one on look out, two on patrol and two resting in the camp but feel free to draw up the roster however you choose.
The tension in any fight is that the guards from other areas may arrive as reinforcements.

The Fire Breathing Bear.
Here is a stat block for a fire breathing bear that you shouldn't use in your session.


Not everything in the world is the party's level and they shouldn't necessarily open every door.  If it's to be interacted with at all it is as a puzzle rather than an 'encounter', something to be used as a tool if they can figure out how. E.G. what happens if they open the door and dash away whilst being pursued by guards? This monster will absolutely murder 1st level players so be cautious.

The Laboratory.
The final show down! You may notice a table between the door and our evil mage. This is there to help them keep range from the melee fighters in the party and instead lock those players down with Lady B. If you're wondering about the dimensions of the lab and how far the mage should be from where the players enter  I propose that the answer is always, "Far enough that the melee fighters can't close with them without taking an opportunity attack from Lady B". If a player chooses to risk the hit, all good, I just suggest that we put a little cost on 'Geeking the Mage'.

Mind Control.
Lady B's mind control is intended to present players with a tough choice. Players must weigh up the risk of harming Lady Briarthorn by targeting her or the brain slug or trying something creative to remove it.  Let them attempt creative stuff. If the role is good let the creative solution work. This keeps them thinking through the combat rather than just doing the 'optimal' attack each round.

Here is a slightly more detailed stat block for the Brain Slug for you.


And that's it - We're all out of Zine! If you've run this adventure with your group I'd love to hear how it went, what worked, what didn't,  any changes you made etc. The play tests produced some very fun stories and I'd love to hear yours.


Till next Issue.

Happy gaming :)